Last Updated on April 2, 2023
This article outlines unusual painting and drawing techniques that are useful for creating exciting sketchbook pages, grounds, textural layers and adding tone and colour to an artwork. While mastery of traditional painting techniques can be all that is needed in a high school art project, sometimes combining traditional methods with wild and inventive approaches is advantageous!
Dip paper directly into paint / ink
Splashing liquid paint or dye onto a surface is one of the most unpredictable and exciting means of applying colour. Take turns at the classroom sink, dipping whole sheets of paper into watered down acrylic, splashing and flicking water across your work: holding paper, canvas or other painting surfaces in the air and letting the paint run down. Once an appealing wash of colour has been achieved, placed the artwork flat to dry, so the paint or ink pools and dries in naturally occuring swirls.

Paint using drips
Gravity can be a superb painting tool. Working with thicker, yet still runny paint (the consistency of house paint is ideal) long splashes and drips of paint can be controlled through tipping and altering the direction of a canvas, or through flicking paint wildly at a work in the style of Jackson Pollock (photographed by Hans Namuth) below.
There was complete silence … Pollock looked at the painting. Then, unexpectedly, he picked up can and paint brush and started to move around the canvas. It was as if he suddenly realised the painting was not finished. His movements, slow at first, gradually became faster and more dance like as he flung black, white, and rust colored paint onto the canvas – Hans Namuth.

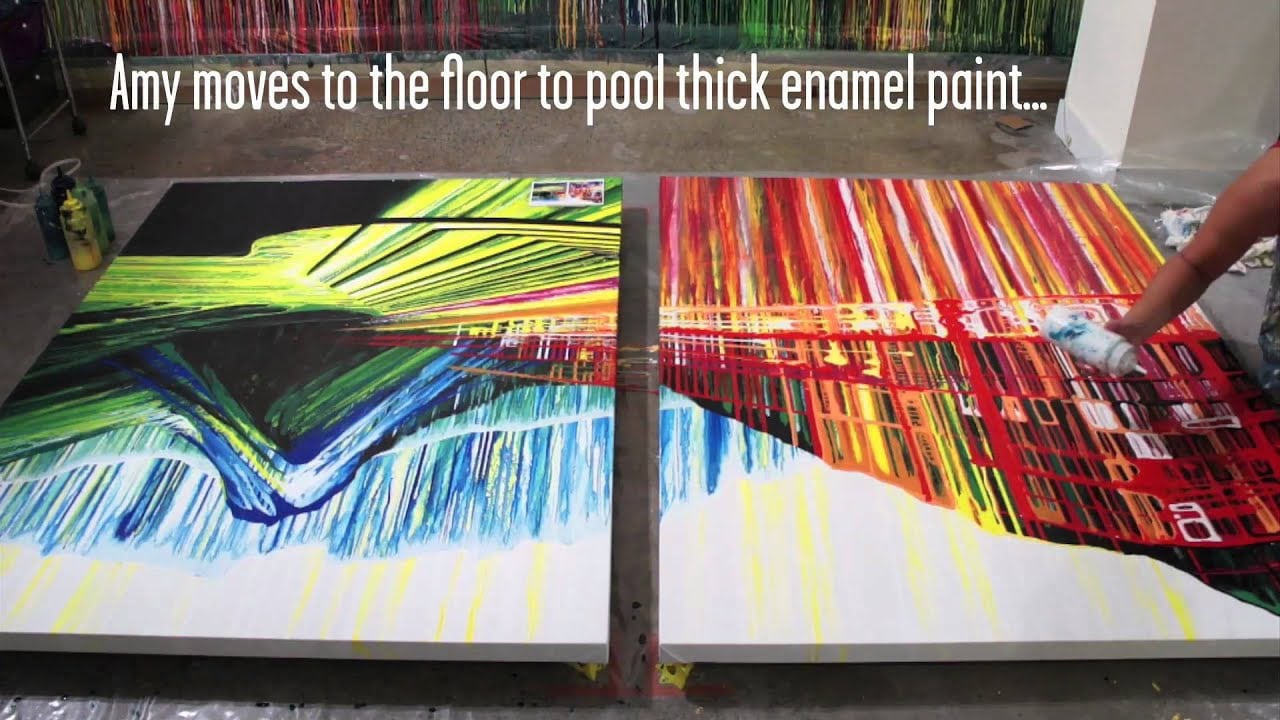
Using only gravity and a rotating canvas (and sometimes string as a guide) Canadian artist Amy Shackleton creates vibrant, complex scenes that are formed entirely from drips of paint squeezed from a bottle:
Paint with your body
Students should never be afraid of mess. Embracing the physical act of painting (removing the boundary between the maker and the artwork) allows you to ‘become one’ with an artwork. Get rid of your school uniform and dress yourself in old painting clothes. Spread a big plastic sheet in the corner of your art room (or go outside) and apply paint using your hands your feet or any part of your body that you dare! (Note: wash yourself thoroughly afterwards so as not to enrage head teachers or senior management)!
Painting with hair by Lilibeth Cuenca Rasmussen:

Painting with feet by Kazuo Shiraga:

Draw using utensils tied to a stick
Just as removing the boundary between the maker and the creation can result in exciting outcomes, so too can exaggerating the gap between the artist and the work. Here we see exciting, gestural drawings by Year 10 students from Bolton School (Girls’ Division):

Smear paint with a rag
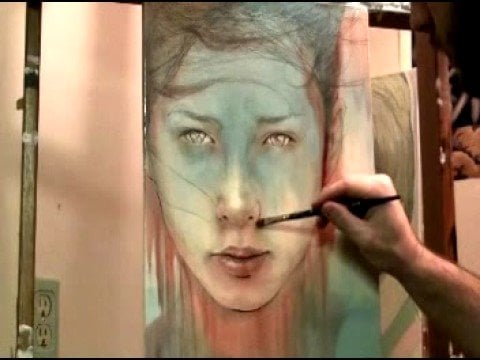
Most students will wipe paint off their work at some point – usually when fearing they have made an error. Michael Shapcott does this with a magical beauty: using a rag to spread paint across his canvas until the right intensity is achieved. Beginning with a detailed graphite under-drawing, he applies oil and acrylic paint over the top and then wipes most of it away. Watching him work is entrancing:
Apply paint with card
An alternative to applying paint with a palette knife is to use the flat edge of a piece of cardboard. This is a cheaper and much more accessible strategy for a high school art student. Able to be cut, bent or folded as required, card is a great material for applying flat areas of colour to a work.
An example of painting with card by artist Mike Bernard:

Paint with a roller
Most students have used a roller to apply printing ink; fewer experiment with using a roller as tool to apply colour to their paintings. Although acrylic paint doesn’t roll out as well as printing ink (it doesn’t spread easily and covers surfaces in an irregular, unpredictable fashion) it is nonetheless a great way of achieving layers of flat tone in an artwork.
An example of painting a sketchbook page background with a roller by Julie Fei-Fan Balzer:

Squash blobs of paint flat with a piece of paper
A less controllable method of achieving areas of flat tone in a work is to press paper in blobs of paint and use these to transfer paint from one area to another (see example at 0.17 in this video by artist Michelle Brown):
Paint with a sponge
Sponges of all kinds make excellent painting accessories. Whether you use specialist artist sponges, cleaning sponges or naturally occurring sea sponges (able to be purchased from most art shops), sponges can be used to apply beautiful textural mark-making to a painting.

Flick paint-covered string
Construction workers flick taught string covered with chalk to mark straight lines in buildings. A similar principle can be used to create painted lines, using string laden with paint.
Examples of painting with string by artist Sophie Munns:

Paint with a mop
Sometimes a mere change of scale can be enough to invigorate and inspire a student. While most students do not have access to enormous brushes like those used by contemporary painter Fabienne Verdier, there are plenty of other substitutes that might make do: old kitchen mops, brooms, branches off trees, large house paint brushes…

Make a drawing machine
Drawing machines come in many shapes and forms. While most high school Art students do not have the time to create complex, automated drawing devices (such as the ones illustrated below), the concept of mechanical application can be used to inspire creative output on a smaller scale.
A drawing machine by Eske Rex:
A drawing machine by Joseph Griffiths:

Penwald drawings by Tony Orrico:

Paint using unconventional mediums
Although care needs to be taken when using materials that are not purpose built for art-making (especially when posting artwork to another country for assessment), avoiding sticky mediums that do not dry cleanly, or those which decay / rot over time, there are plenty of exciting, unusual products that can be used, which are found outside of the art supplies cupboard. Dye from walnut skins, stains from coffee cups, brightly coloured food dyes, splashes of shellac (varnish) and so on, can create wonderful outcomes.
Painting with M&Ms by Nikau Hindin:

Sprinkle watercolours with alcohol or salt
Artists have long known that certain chemicals resist wet paint and can be used to create textural surface patterns. Sprinkle semi-wet washes of watercolour with alcohol, salt, dishwashing soap or bleach etc, and the result will be an organic, intricate pattern.
Example of salt sprinkled onto watercolours by Sarah Knight:

Press foodwrap into watercolours
As with the technique above, pressing crinkled plastic foodwrap (such as Gladwrap) into wet watercolours results in intriguing patterns once the plastic is peeled off when dry.
Example by artist John Burge:

Use gel medium to create digital transfers
Although students should be careful not to rely on digital transfers at the expense of their own observational drawing, there are times when the integration of digital elements in traditional paintings can have spectacular outcomes. The following video by Chrystal Hethcote shows a simple image transfer technique using gel medium, which could be useful for applying a digital image to a traditional painting surface:
Spray paint through holes to create texture or patterns
Painting students often forget that stencils offer exciting possibilities. Items with gaps or holes can act as a stencil through which paint can be sprayed or flicked, creating repeating patterns, textures or irregular marks. Any number of found objects (leaves, branches, feathers, lace, mesh, fabric) or purposefully created items (card templates or paper with holes cut or ripped through it) can be suitable. It is not necessary to purchase large cans of industrial spray paint for this (indeed these can be hard to wield and tend to fill a classroom with paint fumes); rather use small, empty spray bottles from craft shops and fill these with watered down acrylic in appropriate colours.
Application of spray paint through lace by Tara Nelson:

Leaf prints by Diamara:

Card stencils by Julie Fei-Fan Balzer:

Intricate paper stencils by Kris Trappeniers:

Apply ink directly to objects and print them
There are many natural forms (i.e. leaves, fish, mushrooms, eroding sticks) and manmade materials (i.e. corrugated cardboard) which can act as printable objects themselves. While objects should only be used if they support your theme or subject, this can be an exciting method for introducing textural elements to painted artworks.
Gyotaku fish prints by Barry Singer:

Mushroom spore print by Lynn Corsi Bland:

Corrugated cardboard relief print by Christina Leung:

Print from a rotated termite eaten stick by Christina Leung:

Make items to print from
If you are unable to find suitable items to print, make some. From drizzling hot glue to layering strips of cardboard, there are endless ways to create abstract pattern making that can provide interesting mark-making within (or under) a painting. Remember not to make random patterns for the sake of it: select shapes and forms that support the ideas explored within your work.
A hot glue print by Terri Stegmiller:

Printed pattern by Susan Mathews:

Take rubbings / use frottage to add texture
A ‘rubbing’ is the act of laying a piece of paper over a textured item and rubbing a pencil or crayon (or some other medium) over the top to make an impression of that texture on the paper. The frottage art technique simply involves taking a rubbing one step further, and using it to create an artwork that no longer directly mimics the original form. Although it can be difficult to add frottage to paintings (unless as pencil under-drawings), using frottage can quickly result in interesting and varied drawings.
Frottage art by Kumi Yamashita:

Frottage art by Max Ernst:

Paint with any other random thing you can find
When it comes to painting utensils and tools, you are limited only by your imagination. Kids’ toys can be driven through paint; old shoes can be used to create footprints; fly swats can whack gridded patterns across a piece of paper.
Although it is not always necessary to apply paint in wild and unexpected ways, there are times when this can breathe fresh air into your project!
This is the third article in a series aimed at encouraging inventive use of media for high school Painting / Fine Art students. You may also be interested in reading Part 1: How to make your Art Project Exciting and Part 2: Painting on Grounds. If you found this helpful, please share it with your followers using the social media buttons below.

Amiria was a Faculty Curriculum Co-ordinator for many years, responsible for the course design and assessment of student work in two Auckland schools. She has a Bachelor of Architectural Studies, Bachelor of Architecture (First Class Honours) and a Graduate Diploma of Teaching. Amiria is a CIE Accredited Art & Design and Design & Technology Coursework Assessor. She now teaches Art, Design & Technology at ACG Parnell College.
