Last Updated on April 2, 2023
This article contains everything an Art student needs to know about drawing in one point perspective. It includes step-by-step tutorials, lesson plans, handouts, videos and free downloadable worksheets. The material is suitable for middle and high school students, as well as any other person who wishes to learn how to draw using single point perspective. It is written for those with no prior experience with perspective, beginning with basic concepts, before working towards more complex three-dimensional forms.
One point perspective: definition
Dictionary.com define one point perspective as:
…a mathematical system for representing three-dimensional objects and space on a two-dimensional surface by means of intersecting lines that are drawn vertically and horizontally and that radiate from one point on a horizon line…
Although this definition sounds complicated, the concept is relatively simple. One point perspective is a drawing method that shows how things appear to get smaller as they get further away, converging towards a single ‘vanishing point’ on the horizon line. It is a way of drawing objects upon a flat piece of paper (or other drawing surface) so that they look three-dimensional and realistic.
Drawing in one point perspective is usually appropriate when the subject is viewed ‘front-on’ (such as when looking directly at the face of a cube or the wall of building) or when looking directly down something long, like a road or railway track. It is popular drawing method with architects and illustrators, especially when drawing room interiors. To understand more about the history of perspective in art, please read our accompanying Guide to Linear Perspective (coming soon).
Note: If you need to draw something that is not facing you directly, but rather has a corner nearest to you, two point perspective is likely to be more appropriate.
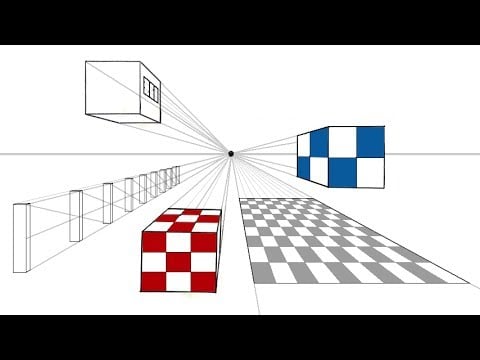
Rules of perspective: true shapes, vanishing points and horizon lines
In one point perspective, surfaces that face the viewer appear as their true shape, without any distortion. They are drawn using primarily horizontal and vertical lines, as illustrated by the diagram below:

Surfaces that travel away from the viewer, on the other hand, converge towards a single ‘vanishing point‘. This is a point that is located directly in front of the viewer’s eyes, on a ‘horizon line’ (also known as an ‘eye level line’), as illustrated in the photo below:
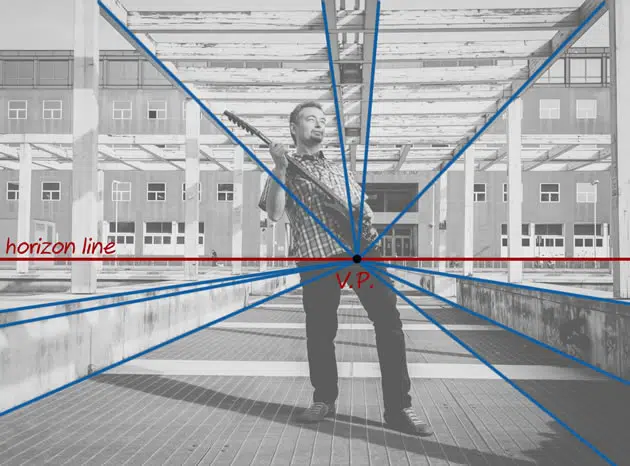
It is possible to draw over photographs to identify vanishing points, horizon lines and true shapes. Studying the work of famous artists can also help you gain an understanding of one point perspective, as shown in the example by Vincent van Gogh below.

Key Points:
- Surfaces that face the viewer are drawn using their true shape
- Surfaces that travel away from the viewer converge towards a single vanishing point
One point perspective tutorial
The following tutorial explains how to draw one point perspective step-by-step. The exercises are designed to be completed in the order given, with each one building upon the previous task. All worksheets are available as a free perspective drawing PDF that can be printed at A4 size (more worksheets will be added to this over time).
The downloadable PDF has been provided by the Student Art Guide for classroom use and may be issued freely to students (credited to studentguide.com), as well as shared via the social media buttons at the bottom of this page. The worksheets may not be published online or shared or distributed in any other way, as per our terms and conditions.
Recommended Equipment:
- Mechanical or ‘clutch’ pencil (with an HB or 2H lead)
- Blank paper and/or the printed worksheets
A ruler and compass can be useful while learning to draw in one point perspective, however most Art students find that these exercises are best completed freehand, with dimensions and proportions gauged by eye. This is so that the skills are easily transferrable to an observational drawing.
EXERCISE 1: CUBES AND RECTANGULAR BLOCKS
Drawing rectangular blocks is often the first one point perspective lesson given to students. It is a simple exercise that provides a solid foundation for things to come.

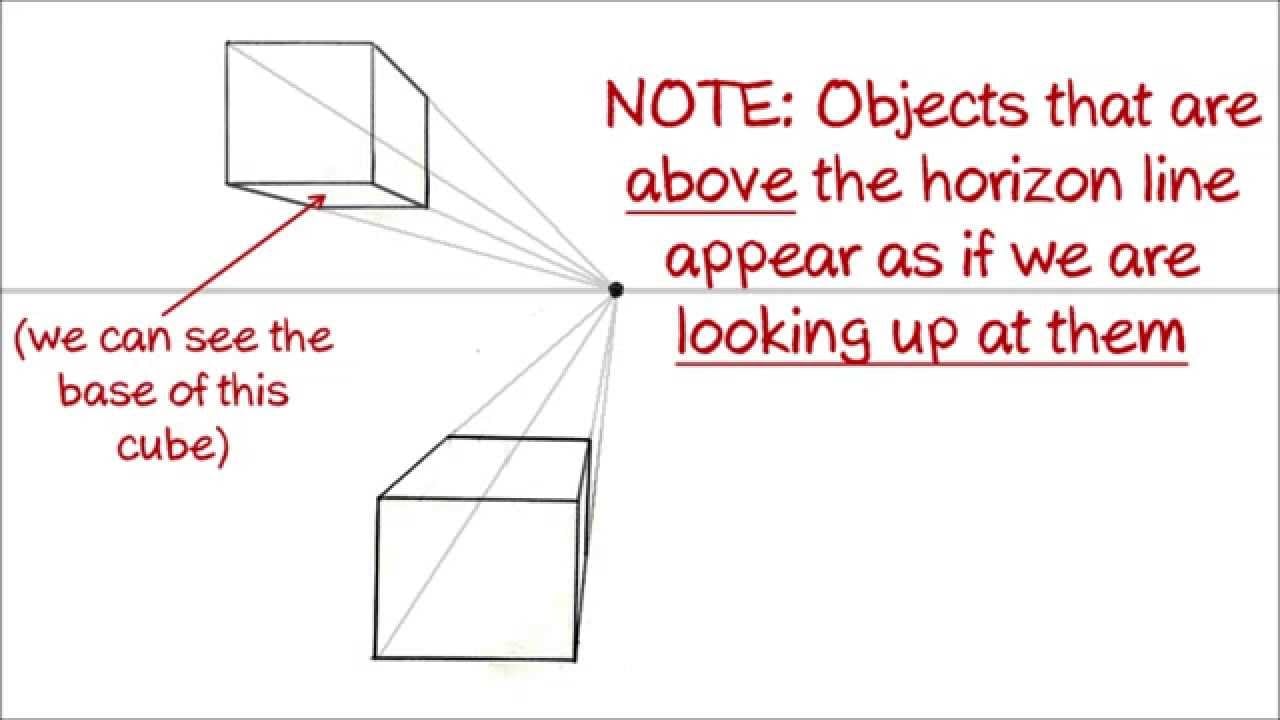
This worksheet explains how to draw a cube in one point perspective and takes you through drawing these above, below and in line with the horizon line. It introduces the importance of line weights and highlights the effect of positioning objects in relation to the horizon line.
By the completion of this exercise, you should be able to:
- Use appropriate line weights (light lines for construction lines; dark lines for outlines)
- Position a vanishing point and horizon line correctly
- Understand that:
- Objects above the horizon line are drawn as if you are looking up at them (you see the bottom of the object)
- Objects below the horizon line are drawn as if you are looking down at them (you see the top of the object)
- Objects that are neither above nor below the horizon line are drawn as if you are looking directly at them (you see neither the top or the bottom of the object)
This information is demonstrated in the video tutorial below:
Exercise 2: stacking, holes and angles

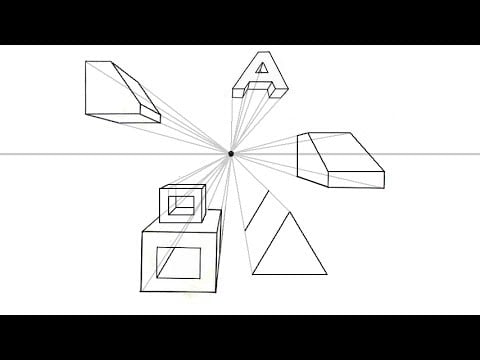
This worksheet illustrates how to stack blocks, cut away portions and add unusual angles in a one point perspective drawing, creating gradually more complex forms.
By the completion of this exercise, you should be able to:
- Draw stacked blocks of different sizes
- Draw blocks that have holes cut out of them, projecting construction lines to find the back edge of the cut area
- Slice pieces off blocks and/or add unusual angles
Once you feel confident with drawing these items, you may wish to add more challenging forms, such as letters and/or triangular shaped prisms.
The following video helps to explain how to draw one point perspective drawing step-by-step:
An artist example of perspective by Robert C. Jackson:

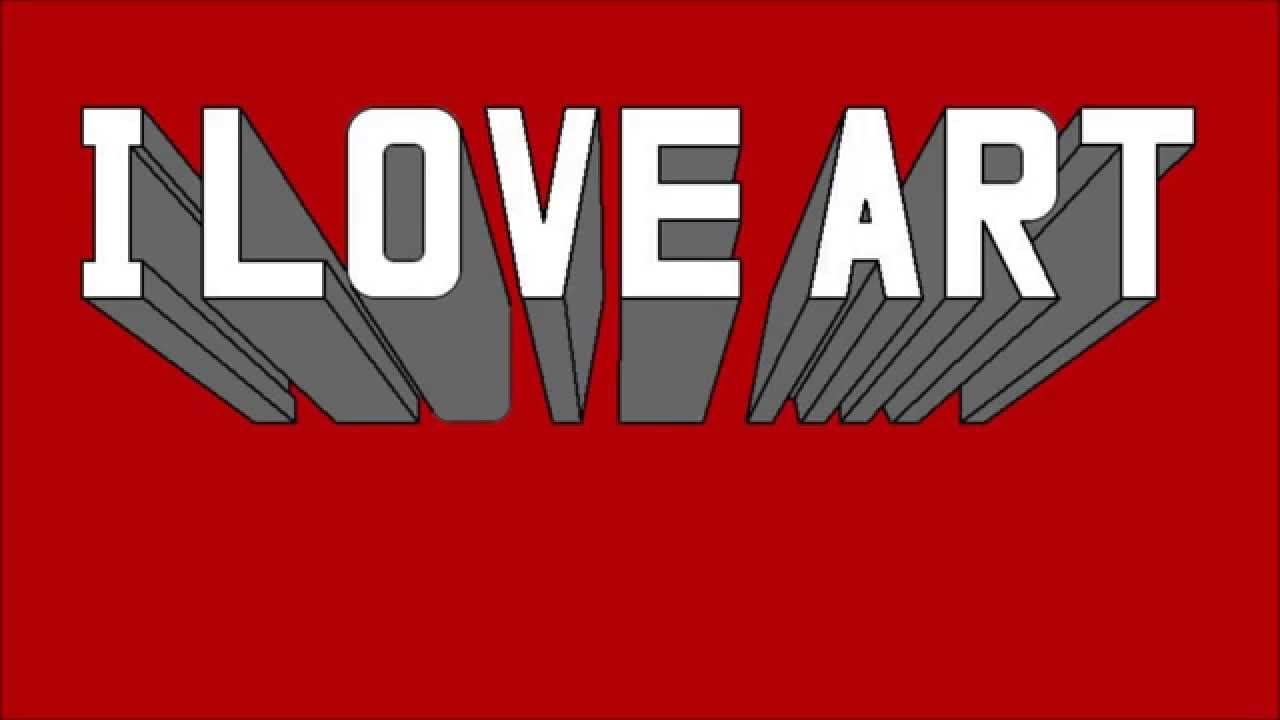
Exercise 3: perspective block letters
Drawing block lettering in one point perspective is a relatively straight-forward task, suitable for a homework activity.
The following video demonstrates how to do this:
Exercise 4: finding centres and equal spaces
This video explains how to equally divide items in one point perspective, allowing you to draw fence posts, lamp posts, and equally spaced windows or buildings.
By the completion of this exercise, you should be able to:
- Find the centre of any rectangular surface using the ‘corner to corner’ method (this works even on surfaces that are receding towards the vanishing point)
- Divide the surface of any rectangular block into any number of equal parts
- Draw tiles on a floor in one point perspective
- Draw repeating elements, such as fence posts, receding into the distance
This is explained in the following video tutorial:
Exercise 5: one point perspective cityscape
Drawing a road and surrounding cityscape (either imagined or observed from real life) is a great follow-up activity to the previous exercises. A one point perspective street scene typically combines repetitive manmade elements with stacked, cut and angular forms. This exercise can be as challenging or minimal as desired, allowing able students to move ahead and produce detailed, elaborate drawings.
One point perspective city scene by Lichtgestalt00:

A suburban scene by Karina Barabanova:

A one point perspective painting by Gustave Caillebotte:

A sketch by Daniyar:

Exercise 6: circles and curves
The most challenging aspect of perspective is drawing curving or circular forms. These are typically sketched freehand, inside squares or rectangles to help get proportions correct.
Key points:
- Use the technique of ‘crating’ – drawing complex forms inside rectangular boxes
- Use straight lines (guidelines) to aid the drawing of irregular curves, such as the curving forms of rivers or trees in a one point perspective landscape
- Understand that:
- Circles or curving forms that face the viewer are drawn using their true shape
- Circles that recede towards the vanishing point appear distorted, appearing smaller as they get further away
A one point perspective drawing by Stephanie Sipp, a professor at Florida State College of Jacksonville, Interior Design department:

A perspective landscape by Vincent van Gogh:

A drawing by high school student Estherlicious:

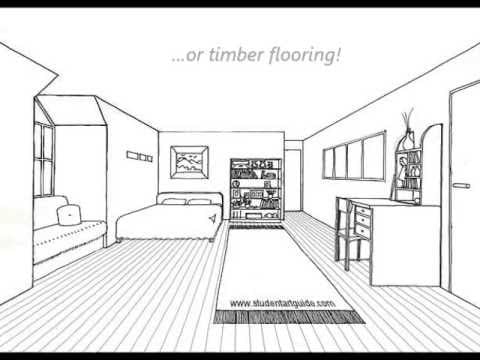
Exercise 7: one point perspective room
The most common perspective drawing lesson is a one point perspective room. Interiors combine a multitude of skills and can be made as challenging or involved as required. Perspective flooring allows you to practise dividing surfaces into equal spaces, while the questions of how to draw a window in perspective; furniture / desks / beds; or adjoining corridors etc provide a challenge regardless of your ability level. To gain ideas about how you might approach drawing interiors in perspective, we have included a range of examples below, including bedrooms, living rooms, kitchens and hallways. Drawing a room in one point perspective can be great practise for those who wish to later pursue interior design, architecture or for those who are studying Design Technology at high school.

The illustration above shows a one point perspective grid (this may be downloaded and printed for classroom use) which may be drawn on directly or traced over, using a lightbox.
To understand how to draw a room in one point perspective, please view our step-by-step video:
Please note that this video is not captioned, as it is hoped that the challenging aspects of this exercise are explained earlier in this guide.

A one point perspective room by Dutch renaissance architect, painter and engineer, Jans Vredeman de Vries:

A one point perspective interior by Amani Cagatin:

A one point perspective bedroom by Cheryl Teh Veen Chea of One Academy:

A one point perspective kitchen by Dana Bailey:

A one point perspective hallway by Jake Mutch, completed while studying Fundamental Arts at Holland College:

A perspective interior by S.Kim:

A drawing by Abby Hope Skinner, whose Top in the World A Level Art project has also featured on the Student Art Guide:

This guide is part of our Essential Lessons for Art Students (a series of articles packed with downloadable teaching resources) such as our guide to line drawing. This is a work in progress and will be added to over time!

Amiria was a Faculty Curriculum Co-ordinator for many years, responsible for the course design and assessment of student work in two Auckland schools. She has a Bachelor of Architectural Studies, Bachelor of Architecture (First Class Honours) and a Graduate Diploma of Teaching. Amiria is a CIE Accredited Art & Design and Design & Technology Coursework Assessor. She now teaches Art, Design & Technology at ACG Parnell College.
